
Ok I guess you saw my mom's April fool's joke about us adopting again, some of you wanted to know how I did it so I'm posting a guide on how-to make funny faces in photoshop.
What you need:
- Adobe photoshop elements 6.0 or higher. (about $75 at Wal-Mart.)
- Two or more pictures of a family member with about the same lighting. (so parts of the face aren't brighter than the other.)
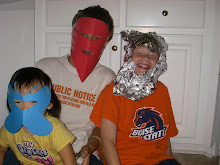
Here are the photos we used.
If you notice Luci's head is slightly turned, try to avoid that if possible.
 These pictures all have about the same lighting.
 My dads picture was taken in another room but the lighting is still almost the same as the pictures above.
How to do it:
1. When you bring up photoshop it will ask you what you want to do, click the "EDIT" option, it will also ask you if you want to register just choose the register later option. Upload your pictures into photoshop.
2. Choose the face you want to use as your main face. (In the April fool's joke we used Luci's face as the main background face.)
3. Ok lets do the eyes first, lets use my dads eyes. Choose his picture and then look at the tools on the upper left, there is a tool that looks like a rectangular dotted line, if you highlight it its called the Rectangular marquee tool. Highlight one of his eyes, (It doesn't matter if you highlight a big section I'll tell you how to fix that later.)
4. One of the eyes should have a moving dotted line going around it. Select the moving tool, it looks like a black or grey cursor at the top of the tools section. What you do now is drag and drop the eye onto the main picture. (In our case its Luci's picture.) You might be thinking, "This doesn't look like what I saw on Susan's blog, it just looks like I put part of a picture on top of another!", Well that's true all you did was put one picture on top of another. If you want me to tell you how to do the rest then call 900-555-4454 and you can order Bryan's awesome photoshop skillz for only 3 payments of $19.95!!! But order in the next 10 minutes and it only costs $65.95!!!!
5. Just kidding, what you do next is move the picture over Luci's actual eye and select the eraser tool, its near the bottom. No this won't erase Luci's picture but it will erase the extra part of the copied eye, so erase all the parts of the eye that you don't need. You can stretch and skew the eye so it fits correctly.
6. Well that's basically it, just follow the previous steps for the rest of the body parts! Our finished picture is at the top of this post.

2 comments:
Good job!!! I like your number 4 rule. You are a nut. Three payments of $19.95. LOL
Interesting
Post a Comment